Table of Contents
Introduction
This article provides a technical overview of configuring and managing several advanced features in a self-hosted Temporal cluster. The focus is on three specific areas: workflow archival, data migration strategies, and security configurations.
Archival
Temporal’s Archival feature automatically offloads completed workflow histories to cheaper, long-term blob storage like Amazon S3 or Google Cloud Storage.
This is essential for meeting compliance and auditing requirements, enabling historical debugging, and reducing the cost and operational load on the primary database.
Configuration
Example of how to configure the Temporal archival feature together with the local S3 garage service.
Create two S3 buckets with proper permissions:
/garage bucket create temporal-history-archive
/garage bucket create temporal-visibility-archive
/garage key create local
/garage bucket allow --read --write --owner temporal-history-archive --key local
/garage bucket allow --read --write --owner temporal-visibility-archive --key local
Create a Kubernetes secret that allows access from Temporal to S3:
kubectl create secret generic temporal-s3-credentials \
  -n temporal \
  --from-literal=AWS_ACCESS_KEY_ID='<aws-access-key>' \
  --from-literal=AWS_SECRET_ACCESS_KEY='<aws-secret-key>'
Following the Helm temporal configuration is used:
server:
  additionalEnvSecretName: temporal-s3-credentials
  archival:
    history:
      state: "enabled"
      enableRead: true
      provider:
        s3store:
          region: "us-east-1"
          endpoint: "http://garage.garage.svc.cluster.local:3900"
          s3ForcePathStyle: true
    visibility:
      state: "enabled"
      enableRead: true
      provider:
        s3store:
          region: "us-east-1"
          endpoint: "http://garage.garage.svc.cluster.local:3900"
          s3ForcePathStyle: true

  namespaceDefaults:
    archival:
      history:
        state: "enabled"
        URI: "s3://temporal-history-archive"
      visibility:
        state: "enabled"
        URI: "s3://temporal-visibility-archive"
  config:
    namespaces:
      create: true
      namespace:
        - name: default
          retention: 1h
After deploying the temporal cluster, you need to activate archival for a specific namespace:
tctl --namespace default namespace update --history_archival_state "enabled" \
--visibility_archival_state "enabled"
It’s not possible to do it from the helm values level.
Usage
After the workflow is marked and completed in a cluster configured with the archival feature enabled, then after a few seconds, it’s visible in the “Archive” tab:
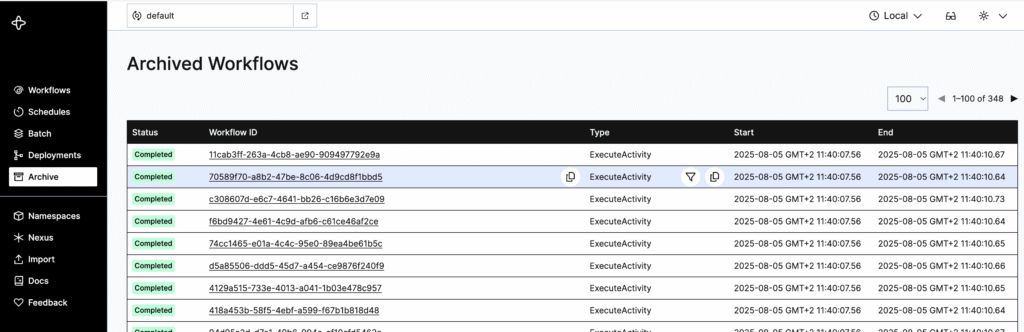
And after clicking its ID, the user is redirected to the workflow tab and can see all information regarding the specific workflow. At this point, the workflow is not yet archived, but it’s marked to be archived after a specific retention period. And all information regarding specific workflows is fetched directly from the database.
After the retention period has expired for a specific workflow, it’s moved from the database to S3 storage. And it’s no longer visible in the “Workflows” tab.
Information about archived workflows can then only be visible in the “Archive” tab. And after clicking the ID of the workflow, the user would expect that the data would be fetched from S3 and displayed, but it doesn’t work; there is a pending bug for Temporal. https://github.com/temporalio/temporal/issues/5022
Then there are only two ways to access workflow history and workflow visibility information. It can be done by downloading files from S3 directly or using the tcnt client.
aws s3 cp s3://temporal-history-archive/3f18e128-05b9-45da-a51c-78cb68a723e5/history/ff1587a8-9b8f-40ba-9c76-926731d1c6f6/0198799a-c3ca-7e7b-9720-5396f5d4d23c/0/0 . --profile garage --endpoint-url <your-s3-url>
The downloaded file has a JSON format with the following content:
{
  "header": {
    "namespace": "default",
    "namespaceId": "3f18e128-05b9-45da-a51c-78cb68a723e5",
    "workflowId": "ff1587a8-9b8f-40ba-9c76-926731d1c6f6",
    "runId": "0198799a-c3ca-7e7b-9720-5396f5d4d23c",
    "isLast": true,
    "firstEventId": "1",
    "lastEventId": "245",
    "eventCount": "245"
  },
  "body": [
    {
      "events": [
        {
          "eventId": "1",
          "eventTime": "2025-08-05T09:40:42.570949828Z",
          "eventType": "EVENT_TYPE_WORKFLOW_EXECUTION_STARTED",
          "taskId": "1049890",
          "workflowExecutionStartedEventAttributes": {
            "workflowType": {
              "name": "ExecuteActivity"
            },
            "taskQueue": {
              "name": "benchmark",
              "kind": "TASK_QUEUE_KIND_NORMAL"
            }
            // ... data truncated here
          }
        }
      ]
    }
  ]
}
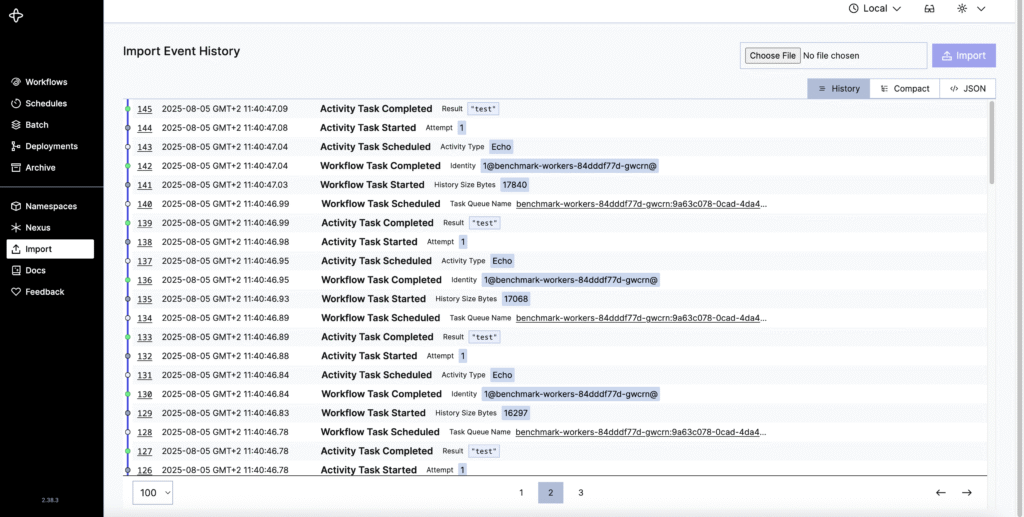
The “events” part can be extracted and imported to Temporal using the import functionality. It will allow us to see the history of single events in a GUI:
Historical events and visibility records can also be fetched from AWS S3 using the tctl client and SDKs. For example:
 tctl workflow show --workflow_id ff1587a8-9b8f-40ba-9c76-926731d1c6f6 --run_id 0198799a-c3ca-7e7b-9720-5396f5d4d23c
    1  WorkflowExecutionStarted    {WorkflowType:{Name:ExecuteActivity}, ParentInitiatedEventId:0,
                                   TaskQueue:{Name:benchmark, Kind:Normal},
                                   Input:[{"Activity":"Echo","Count":40,"Input":{"Message":"test"}}],
                                   WorkflowExecutionTimeout:0s, WorkflowRunTimeout:0s,
                                   WorkflowTaskTimeout:10s, Initiator:Unspecified,
                                   OriginalExecutionRunId:0198799a-c3ca-7e7b-9720-5396f5d4d23c,
                                   Identity:1@benchmark-soak-test-7994cbf5b7-zkvlr@,
                                   FirstExecutionRunId:0198799a-c3ca-7e7b-9720-5396f5d4d23c, Attempt:1,
                                   FirstWorkflowTaskBackoff:0s, ParentInitiatedEventVersion:0}
    2  WorkflowTaskScheduled       {TaskQueue:{Name:benchmark,
Data copy
Recommended tools
Completed and long-running workflows can be migrated to another platform using two tools:
- Migration tool https://temporal.io/blog/announcing-automated-migrations allows transferring completed and long-running workflows from one platform to another. For now, this tool has experimental status and allows only self-hosted to cloud migration.
- Multi-cluster replication. Historical and long-running workflows can be migrated to another platform using the multi-cluster replication feature. After enabling it, events are copied asynchronously to another cluster. It has experimental status and is primarily used for backup and state reconstruction.
Alternatives
Long-running workflows can be moved to another platform by passing the current status in code to another platform. Feature called: https://docs.temporal.io/workflow-execution/continue-as-new can be used for this purpose. The problem with this approach is that it workers need to be connected to two different platforms at the same time, and the whole code logic needs to be implemented, which allows such a transition. Which is really complicated.
Historical events can be exported as a JSON using the tcnt command line tool or Archival, but there is no way to import them later to the primary database on another platform. It can be used either for debugging or analysing historical data. This exported JSON can be further used for the Reply feature: https://docs.temporal.io/workflow-execution#replay
Summary
Currently, there is no good way to migrate long-running workflows and historical workflows to another platform. Two tools described in the Recommended tools section exist, but they are both experimental and have some constraints.
Security
Protecting persistence storage
To maintain the stability and security of your self-hosted Temporal cluster, it’s crucial to set Queries Per Second (QPS) limits on your persistence store using dynamic configuration. This prevents any single Temporal service from overwhelming your database, which could lead to service degradation, increased latency, or system outages. By controlling the rate at which services interact with the database, you ensure optimal performance and resource allocation, especially under heavy or fluctuating workloads.
Here’s a brief explanation of each QPS limit and its purpose:
- frontend.persistenceMaxQPS: This sets the maximum persistence queries per second for each Frontend Service host. The Frontend Service is the entry point for all client and Worker SDK traffic, so limiting its QPS prevents individual instances from flooding the database34.
- matching.persistenceMaxQPS: This defines the maximum persistence queries per second that each Matching Service host can send. The Matching Service manages Task Queues and dispatches tasks; this limit protects the database from excessive load during high task volumes34.
- history.persistenceMaxQPS: This specifies the maximum persistence queries per second for each History Service host. The History Service manages workflow execution state and event history, making it the most write-heavy component. Setting a high but controlled QPS is vital to prevent database overload from this critical service.
- history.persistenceGlobalMaxQPS: This limits the aggregate persistence queries per second for the entire History Service across all its hosts in the cluster. It acts as an overarching throttle, ensuring the collective History Service activity doesn’t exhaust database resources.
- history.persistencePerShardNamespaceMaxQPS: This provides a per-shard QPS limit for the History Service, specifically for a given Namespace. It’s important for multi-tenant environments to prevent a “noisy neighbor” workflow or Namespace from monopolizing resources on a single database shard and impacting other workflows.
By configuring these limits, you safeguard your database’s capacity, promote fair resource usage across namespaces, and significantly enhance the reliability and availability of your Temporal deployment.
Protecting frontend
Protecting your Temporal Frontend Service is paramount for the stability and security of your self-hosted Temporal cluster, as all client and SDK worker communications pass through it. To prevent your Temporal cluster from being overwhelmed by excessive requests or too many concurrent connections, it’s crucial to set Request Per Second (RPS) limits and concurrent poller limits within Temporal’s dynamic configuration. These limits act as essential safeguards, preventing a single client, worker, or namespace from degrading service performance or causing system outages due to high load.
Exceeding these configured limits can lead to ResourceExhaustedError, indicating that the system is under stress. By proactively setting these, you ensure fair resource usage and consistent quality of service for all your workflows.
Here are the specific limits and their purposes:
RPS Limits (to control the rate of requests):
◦ frontend.globalNamespaceRPS: This limit controls the total Request Per Second (RPS) accepted per Namespace, applied across all Frontend Service instances in the cluster. It ensures that no single Namespace can monopolize the Frontend resources, preventing a “noisy neighbor” problem. The limit is evenly distributed among available Frontend Service instances.
◦ frontend.globalRPS: This limit sets the overall maximum Request Per Second (RPS) that the entire Frontend Service, across all its instances, can accept, independent of specific namespaces. This is a crucial aggregate throttle for the Frontend.
Concurrent Long-Poll Limits (to control active connections from workers):
◦ frontend.globalNamespaceCount: This limit specifies the maximum number of concurrent Task Queue long-poll connections allowed per Namespace, applied across all Frontend Service instances. This prevents an excessive number of active connections from consuming too many Frontend resources, which could otherwise lead to performance degradation or instability.
By carefully configuring and monitoring these dynamic limits, you establish a robust defense for your Temporal Frontend, enhancing the reliability, availability, and security of your self-hosted Temporal deployment.
Codec Server for Data Encryption
Temporal uses a client-side encryption model, meaning sensitive data in workflow payloads is encrypted by your Worker or Client before it’s sent to the Temporal Server. The server only stores the encrypted data, never seeing the plaintext.
To view this sensitive data in the Temporal Web UI or CLI, you must use a Codec Server. This is a standalone HTTP server that you create, which exposes your custom data codec (the logic for encrypting and decrypting) via API endpoints.
Securing your Codec Server is paramount. It should be an HTTPS server that integrates with your organization’s authentication provider (e.g., OAuth). You must also enable CORS (Cross-Origin Resource Sharing) so it can accept requests from the Web UI. For both Temporal Cloud and self-hosted setups, the UI can be configured to pass JWT access tokens to your Codec Server for request authorization.
Web UI security
For a self-hosted Temporal Web UI, you can easily enable authentication and authorization. By setting environment variables like TEMPORAL_AUTH_ENABLED=true, you can integrate with an identity provider (IdP) using protocols like OAuth/OIDC. This requires configuring your provider’s details, such as the client ID, client secret, and callback URL, to secure access for your users.
Securing Worker & API Communication
mTLS for Encrypted Communication
Temporal supports mTLS (Mutual Transport Layer Security) to encrypt all network traffic between your workers and the Temporal Service. In a self-hosted cluster, you configure this in the tls section of the server’s static configuration file.
This setup involves providing client CA certificates to authenticate connections. To prevent spoofing and Man-in-the-Middle (MITM) attacks, you should always specify the serverName in the client’s mTLS configuration. This ensures the client only connects to a server presenting a certificate with a matching Common Name (CN).
API Authentication and Authorization
Temporal provides pluggable interfaces to control who can perform certain actions. The Frontend Service uses these plugins to authorize API calls before executing an operation.
ClaimMapper: Extracts claims from a JWT access token.Authorizer: Uses the claims to make access control decisions.
For a self-hosted deployment, you can implement a custom Authorizer to enforce specific permissions, such as restricting who can create namespaces or access Nexus Endpoints.
| Workers connecting to the Frontend | mTLS Only | Best Practice. Simple, high-performance, machine-to-machine trust. The Worker is a core, trusted part of your system. |
| Web Dashboard/API calling the Frontend | mTLS + JWT Authorization on Frontend | Best Practice. Provides defense-in-depth. mTLS secures the channel, and JWT authorizes the specific user action. |